
Though Oxenfree 2: Lost Signals might be a narrative game first and foremost, it isn’t without some variety in its gameplay. Players can hunt for collectibles, traverse the landscape, and solve puzzles to escape time loop-based obstacles. That last one isn’t always easy to do though, so don’t fret if you feel like you’re running up against a wall with them. You might even be to the point where you just want to know what all the Time Loop Puzzle solutions are in Oxenfree 2.
Luckily, we’ve got the answers you’re looking for. However, it should be noted that we will need to go into light spoilers for some of the puzzles. As such, you should be aware that there are *Spoilers Ahead.*
Every Time Loop Puzzle Solution in Oxenfree 2
There are three Time Loop Puzzle segments in Oxenfree 2, and each follows the same general formula. After you exhaust all of the story-related dialogue, you can interact with machines to align hidden shapes and escape the loop. We’ve detailed exactly where you need to go to find each machine — and how to solve their shape puzzles — down below.
How to Solve Uptown Center Time Loop Puzzle
The first puzzle occurs after Riley and Jacob are launched through time at Camber Cape. You’ll need to exhaust the dialogue interactions with Evelyn and Olivia before you can search for the machines that are keeping you there.
after you clear these dialogue exchanges, head up the stairs toward the General Store and then head right toward the bridge. This will bring you to the first machine, and you can interact with it by pressing the X Button.
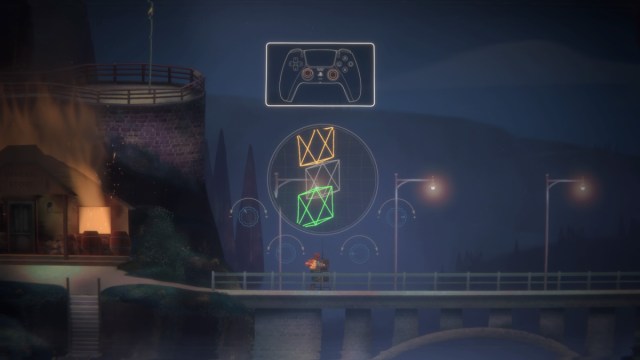
This will bring up a screen with three geometric shapes: One yellow shape, one green shape, and one grey shape. The left and right analogue sticks will move the colored shapes, while the grey shape will remain stationary.
Move the left and right analogue sticks to align the yellow and green geometric shapes with the Grey shape in the middle of the screen. After you’ve done this, the machine will deactivate and you’ll be halfway toward solving the puzzle.

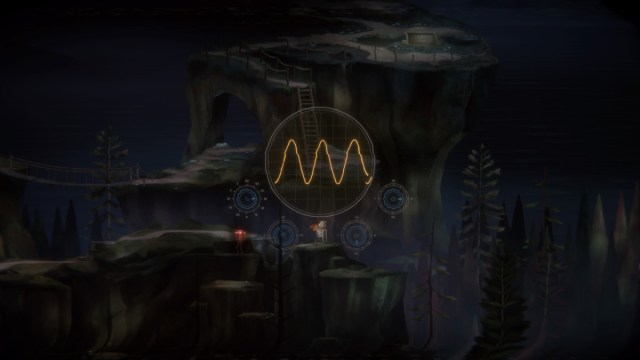
Next, head back toward the General Store and then go further left to find the second machine. Interact with it, and some scattered, multi-colored dots will appear on the screen. Move the left analogue stick up or down to turn the scattered dots into a sound wave, and then push the left stick to the right to shorten it as much as possible. This should cause the wave to turn green.
Once this occurs, move the left analogue stick up or down to stretch the wave out and reveal a square shape. From there, move the perspective around using the right analogue stick and a red cube will appear at the center of the screen. Line it up with the green square, and the puzzle will be solved.
How to Solve Charity Point Time Loop Puzzle
The next Time Loop Puzzle in Oxenfree 2 occurs when you go to Charity Point. You’ll need to attempt to get Violet off of the bridge a couple of times before you’ll be able to find the area’s sole Time Loop machine to the right of Jacob.
Once you can move freely, head to the right of Jacob to find the machine. Interact with it, and another Wave-shaped puzzle will appear. Move the left analogue stick to the left or right until it’s shortened as much as possible. Then, move the left analogue stick up or down to make it resemble a new, flattened yellow cube shape.
Next, move the right analogue stick up or down until the cube expands and a red cube shape appears behind it. Move the right analogue stick left or right until you find the angle where the two can overlap, and fine tune the angle by moving the right analogue stick up or down as needed. Once they’re aligned, the puzzle will be solved and you’ll escape the second loop.
How to Solve the Garland Ghost Town Time Loop Puzzle

The final Time Loop Puzzle in Oxenfree 2 occurs at the Garland Ghost Town after Jacob falls through the church. You’ll have to exhaust a few mandatory dialogue exchanges like usual, but there’ll also be a new type of puzzle to solve involving candles.
Once you regain control of Riley, go up to the candle at the top of the room and grab it. Then, light the unlit candles throughout the room in this specific order: Bottom left, top left, and then bottom right.
another cutscene will trigger, and once it’s done a machine will appear at the front of the church. interact with it to reveal a square wave shape. Move the left analogue stick left or right until you’ve shrunken the wave as much as possible, and then move the left analogue stick down. Doing so changes the perspective and reveals the lines are a yellow diamond, and that there’s a white diamond behind it.
Use the right analogue stick to reposition your view until the diamonds are aligned, and the puzzle will be solved.
Hopefully this guide covering every Time Loop Puzzle solution in Oxenfree 2 makes your playthrough a bit more enjoyable. For tips and tricks related to the game’s tasks and mechanics, scroll down and take a look at our other guides.